1.1 Determine domain name
Before you begin, make sure you have a DNS record set up for this container. In this guide, we will use "teams-installation.example.com" (no quotes) as an example.
Note: It's important to use SSL to make sure everything works correctly
1.2 Azure Bot
1.2.1 Setting up the resource
- Open 'https://portal.azure.com' as an administrator and log in using your organization's credentials.
- Search for the resource called & 'Azure Bot'. You can find guidance on this process here: Azure Bot Service Quickstart Registration.
- When creating the Azure Bot resource, the free plan should suffice. Choose 'Multi Tenant' as the Type of App.
- Once you've finished setting up the resource, you can proceed from the deployment overview to the actual Azure Bot resource itself.
1.2.2 Configuring Azure Bot
- Inside the Azure Bot resource, navigate to Settings > Configuration. Refer to the image below for visual guidance.

Overview settings.
Here are the recommended settings changes and actions: 1. Modify the "Messaging Endpoint":
2. Save the Microsoft App ID:
3. Retrieve the Secret for the Microsoft App ID:
|
2. Once again in the 'Settings' section, proceed to the Channels tab. Within this section, locate and select
'Microsoft Teams'. You will need to read and acknowledge the terms of service.
3. After completing the above step, navigate to the 'Messaging' tab within the Microsoft Teams channel.
Ensure that the option 'Microsoft Teams Commercial' is chosen. Refer to the image below for visual
guidance.
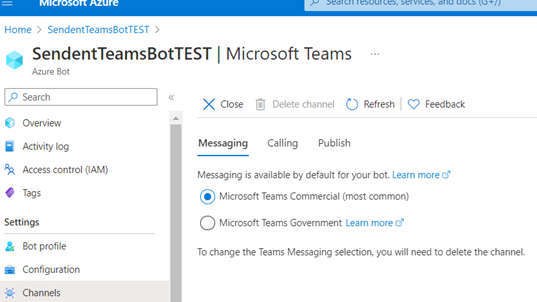
Messaging tab.
1.3 Setting up Docker
To get the Sendent Microsoft Teams integration, use this command:
docker pull rg.nl-ams.scw.cloud/sendent-public/sendent-msteams:latestPlease note that the internal binding is established on port 4200 for this integration.
Available environment variables:
Name | Explanation | Example |
BASE_URL | This should be the FQDN referencing to your publicly available docker image through reverse proxy. | |
MSAPP_TYPE | Default: MultiTenant | MultiTenant |
MSAPP_ID | This is the Azure Bot’s app-id. | 20d67bc1-6f95-4c2d-a49c-e8463163e30d |
MSAPP_PASSWORD | This is the Azure Bot’s password | Example_password_123! |
MSAPP_TENANT_ID | Your Azure Tenant ID | 92785bec-a2fa-434b-9105-9325e5cb721c |
Note: Please be aware that our support is limited to the Docker image and does not extend to the reverse-proxy itself. During our testing, NGINX was the chosen reverse-proxy. Regardless of the choice, make sure to install a valid SSL certificate. 1.4 Modify manifest
- Download and extract this ZIP file. You'll find three files inside.
- Manifest.json
- 2 icons
2. Open the "manifest.json" file and locate the value labeled "microsoft_bot_service_app_id". Replace
this value with the GUID from your Azure Bot framework's app-id.
- Note: This replacement needs to be done in 3 separate places within the file.
3. Towards the bottom of the "manifest.json" file, there's a section named "validDomains". Ensure that
your MS Teams hosting domain is listed there. Replace "base_url_without_protocol" with your
own value.
- For instance, if your domain for MS Teams is "https://teams-installation.example.com", your value should be "teams-installation.example.com" (without quotes). Note that "https" is omitted.
4. Save and close the "manifest.json" file.
5. Create a new ZIP file with the three modified files (both icons and the "manifest.json"). Ensure that the
files are at the root level of the ZIP file, without any directories.
- The actual file name of the ZIP doesn't matter.
1.5 Deploy to Microsoft Teams
- Log in to the Microsoft Teams administrator portal.
- In the menu, select 'Teams apps' and then go to 'Manage apps'
- Click on 'Upload new'. In the upcoming modal window, upload the ZIP file you created in the previous step, containing your modifications.
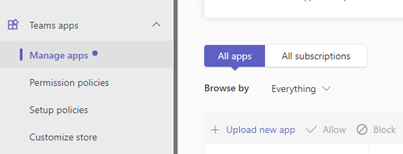
Upload new app in Teams.
4. The installation will take place immediately. If you want users to be able to install apps within Microsoft
Teams themselves, you can skip the last step.
5. If you wish to push the Teams integration to all users, head to "Teams apps" and navigate
to "Setup policies".
6. Click on "Global (org-wide default)".

Pushing the Teams integration to users.
7. In the next dialog, you'l' find two sections:
- Installed apps
- Pinned apps
8. For both sections, click on 'Add apps' and search for 'Sendent'. Select the app (the one you manually
installed) and once done for both sections, click save.

Overview installed apps as global policy.
Note: Keep in mind, as per Microsoft's advise, it might take some time for the policy to be fully pushed.